FutureTask使用和源码解析
FutureTask使用和源码解析
本篇文章说一下java.util.concurrent中的FutureTask。 FutureTask是一个同步工具类,它实现了Future语义,表示了一种抽象的可生成结果的计算。在包括线程池在内的许多工具类中都会用到,弄懂它的实现将有利于我们更加深入地理解Java异步操作实现。
下面是FutureTask的类图:
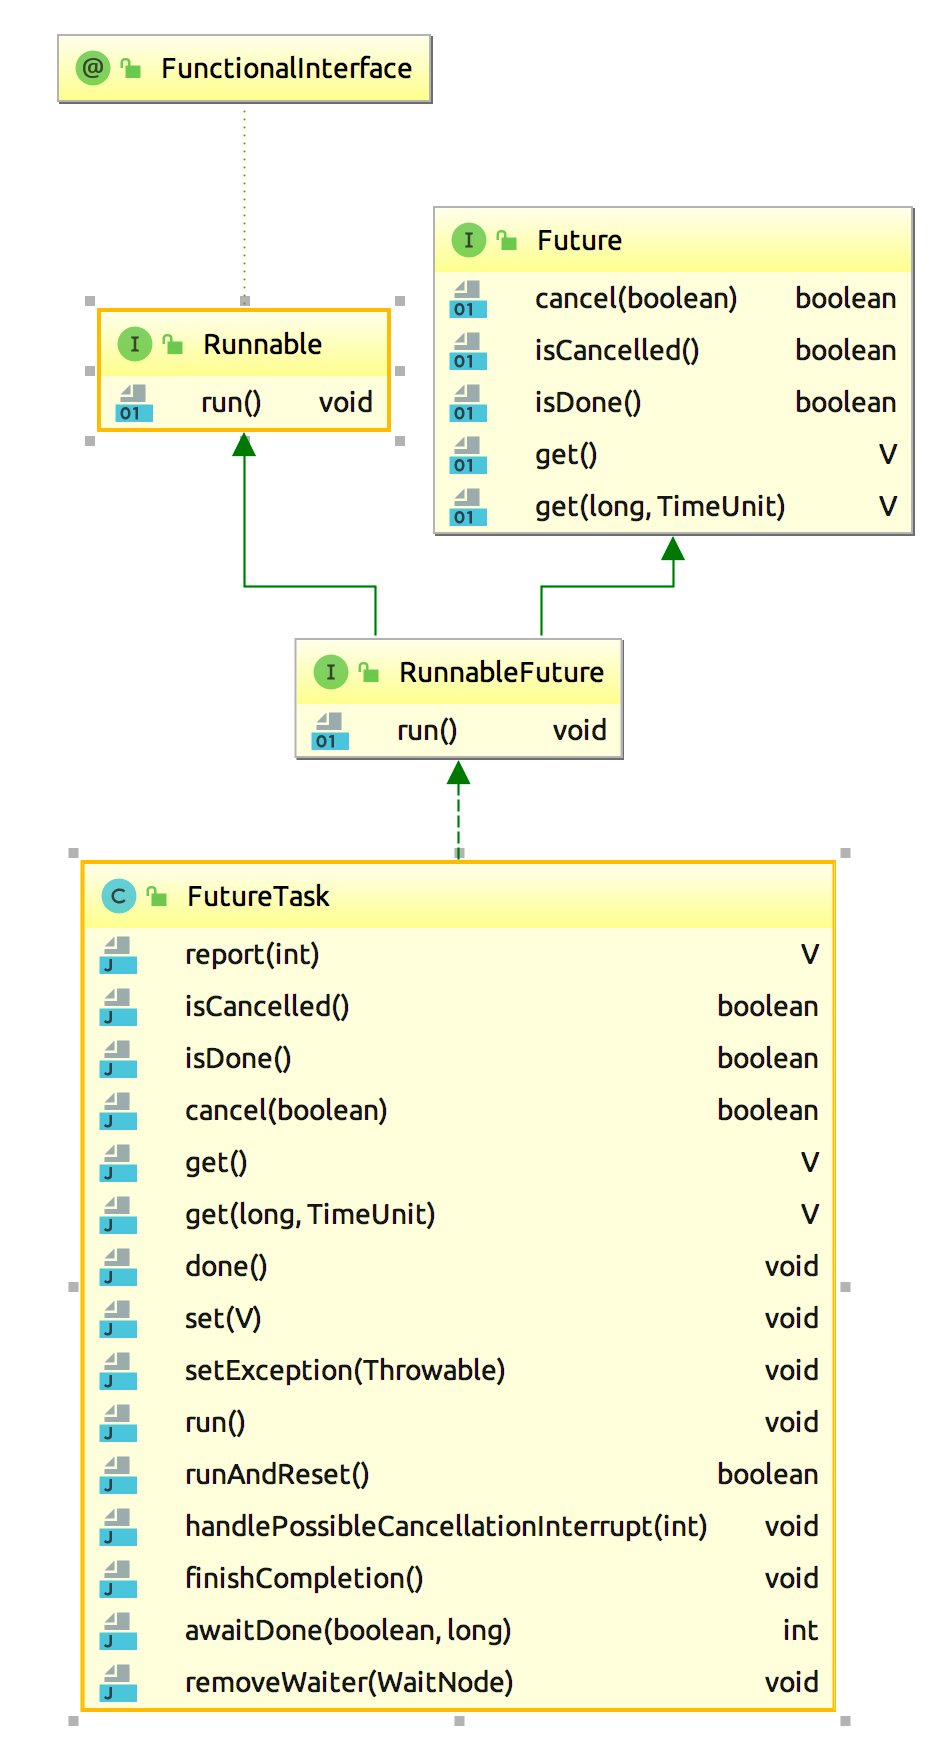
在分析它的源码之前, 我们需要先了解一些预备知识。本篇我们先来看看FutureTask中所使用到的接口:Runnable、Callable、Future、RunnableFuture以及所使用到的工具类Executors,Unsafe。
FutureTask所使用到的接口
Runnable
创建线程最重要的是传递一个run()方法, 这个run方法定义了这个线程要做什么事情, 它被抽象成了Runnable接口:
@FunctionalInterface
public interface Runnable {
    public abstract void run();
}
从这里可以看出Runnable最大的问题有下面2个:
- 没有返回值,我们不能从里面返回相关的处理结果
- 不能抛出
checked exception
而这2个问题,导致我们很多时候使用Runnable其实都会丧失很多的灵活性。而为了解决这两个问题,JDK提供了Callable。
Callable
@FunctionalInterface
public interface Callable<V> {
    /**
     * Computes a result, or throws an exception if unable to do so.
     *
     * @return computed result
     * @throws Exception if unable to compute a result
     */
    V call() throws Exception;
}
对于Runnable可以知道,Callable解决了Runnable的两个最大的问题。但是Callable自己带来了一个问题:就是如何获取返回值。
public static void main(String[] args) {
    Callable<String> myCallable = () -> "This is the results.";
    try {
        String result = myCallable.call();
        System.out.println("Callable 执行的结果是: " + result);
    } catch (Exception e) {
        System.out.println("There is a exception.");
    }
}
这种方式获取的返回值是在当前线程中同步获取的,这种方法确实可以, 但是它存在几个问题:
- call方法是在当前线程中直接调用的, 无法利用多线程。
- call方法可能是一个特别耗时的操作, 这将导致程序停在myCallable.call()调用处, 无法继续运行, 直到call方法返回。
- 如果call方法始终不返回, 我们没办法中断它的运行。
因此, 理想的操作应当是, 我们将call方法提交给另外一个线程执行, 并在合适的时候, 判断任务是否完成, 然后获取线程的执行结果或者撤销任务, 这种思路的实现就是Future接口:
Future
Future接口被设计用来代表一个异步操作的执行结果。你可以用它来获取一个操作的执行结果、取消一个操作、判断一个操作是否已经完成或者是否被取消。
public interface Future<V> {

    /**
     * Attempts to cancel execution of this task.  This attempt will
     * fail if the task has already completed, has already been cancelled,
     * or could not be cancelled for some other reason. If successful,
     * and this task has not started when {@code cancel} is called,
     * this task should never run.  If the task has already started,
     * then the {@code mayInterruptIfRunning} parameter determines
     * whether the thread executing this task should be interrupted in
     * an attempt to stop the task.
     *
     * <p>After this method returns, subsequent calls to {@link #isDone} will
     * always return {@code true}.  Subsequent calls to {@link #isCancelled}
     * will always return {@code true} if this method returned {@code true}.
     *
     * @param mayInterruptIfRunning {@code true} if the thread executing this
     * task should be interrupted; otherwise, in-progress tasks are allowed
     * to complete
     * @return {@code false} if the task could not be cancelled,
     * typically because it has already completed normally;
     * {@code true} otherwise
     */
    boolean cancel(boolean mayInterruptIfRunning);

    /**
     * Returns {@code true} if this task was cancelled before it completed
     * normally.
     *
     * @return {@code true} if this task was cancelled before it completed
     */
    boolean isCancelled();

    /**
     * Returns {@code true} if this task completed.
     *
     * Completion may be due to normal termination, an exception, or
     * cancellation -- in all of these cases, this method will return
     * {@code true}.
     *
     * @return {@code true} if this task completed
     */
    boolean isDone();

    /**
     * Waits if necessary for the computation to complete, and then
     * retrieves its result.
     *
     * @return the computed result
     * @throws CancellationException if the computation was cancelled
     * @throws ExecutionException if the computation threw an
     * exception
     * @throws InterruptedException if the current thread was interrupted
     * while waiting
     */
    V get() throws InterruptedException, ExecutionException;

    /**
     * Waits if necessary for at most the given time for the computation
     * to complete, and then retrieves its result, if available.
     *
     * @param timeout the maximum time to wait
     * @param unit the time unit of the timeout argument
     * @return the computed result
     * @throws CancellationException if the computation was cancelled
     * @throws ExecutionException if the computation threw an
     * exception
     * @throws InterruptedException if the current thread was interrupted
     * while waiting
     * @throws TimeoutException if the wait timed out
     */
    V get(long timeout, TimeUnit unit)
        throws InterruptedException, ExecutionException, TimeoutException;
}
Future接口一共定义了5个方法:
- get()
- 该方法用来获取执行结果, 如果任务还在执行中, 就阻塞等待;
- get(long timeout, TimeUnit unit)
- 该方法同get方法类似, 所不同的是, 它最多等待指定的时间, 如果指定时间内任务没有完成, 则会抛出
TimeoutException异常;
- 该方法同get方法类似, 所不同的是, 它最多等待指定的时间, 如果指定时间内任务没有完成, 则会抛出
- cancel(boolean mayInterruptIfRunning)
- 该方法用来尝试取消一个任务的执行, 它的返回值是boolean类型, 表示取消操作是否成功。以下三种情况之一的,cancel操作一定是失败的,返回false:
- 任务已经执行完成了
- 任务已经被取消过了
- 任务因为某种原因不能被取消
- 值得注意的是,
cancel操作返回true并不代表任务真的就是被取消了,这取决于发动cancel状态时任务所处的状态:- 如果发起cancel时任务还没有开始运行,则随后任务就不会被执行;
- 如果发起cancel时任务已经在运行了,则这时就需要看
mayInterruptIfRunning参数了:- 如果
mayInterruptIfRunning为true, 则当前在执行的任务会被中断 - 如果
mayInterruptIfRunning为false, 则可以允许正在执行的任务继续运行,直到它执行完
- 如果
- 该方法用来尝试取消一个任务的执行, 它的返回值是boolean类型, 表示取消操作是否成功。以下三种情况之一的,cancel操作一定是失败的,返回false:
- isCancelled()
- 该方法用于判断任务是否被取消了。
如果一个任务在正常执行完成之前被cancel掉了, 则返回true。
- 该方法用于判断任务是否被取消了。
- isDone()
- 如果一个任务已经结束, 则返回true。注意, 这里的任务结束包含了以下三种情况:
- 任务正常执行完毕
- 任务抛出了异常
- 任务已经被取消
- 如果一个任务已经结束, 则返回true。注意, 这里的任务结束包含了以下三种情况:
RunnableFuture
RunnableFuture接口同时实现了Runnable接口和Future接口:
/**
 * A {@link Future} that is {@link Runnable}. Successful execution of
 * the {@code run} method causes completion of the {@code Future}
 * and allows access to its results.
 * @see FutureTask
 * @see Executor
 * @since 1.6
 * @author Doug Lea
 * @param <V> The result type returned by this Future's {@code get} method
 */
public interface RunnableFuture<V> extends Runnable, Future<V> {
    /**
     * Sets this Future to the result of its computation
     * unless it has been cancelled.
     */
    void run();
}
FutureTask实现了该接口,也就是相当于它同时实现了Runnable接口和Future接口。
FutureTask所使用到的工具类
Executors
Executors 是一个用于创建线程池的工厂类,关于线程池的概念,我们以后再说。这个类同时也提供了一些有用的静态方法。
前面我们提到了Callable接口,它是JDK1.5才引入的,而Runnable接口在JDK1.0就有了,我们有时候需要将一个已经存在Runnable对象转换成Callable对象,Executors工具类为我们提供了这一实现:
    /**
     * Returns a {@link Callable} object that, when
     * called, runs the given task and returns the given result.  This
     * can be useful when applying methods requiring a
     * {@code Callable} to an otherwise resultless action.
     * @param task the task to run
     * @param result the result to return
     * @param <T> the type of the result
     * @return a callable object
     * @throws NullPointerException if task null
     */
    public static <T> Callable<T> callable(Runnable task, T result) {
        if (task == null)
            throw new NullPointerException();
        return new RunnableAdapter<T>(task, result);
    }

    /**
     * Returns a {@link Callable} object that, when
     * called, runs the given task and returns {@code null}.
     * @param task the task to run
     * @return a callable object
     * @throws NullPointerException if task null
     */
    public static Callable<Object> callable(Runnable task) {
        if (task == null)
            throw new NullPointerException();
        return new RunnableAdapter<Object>(task, null);
    }

    /**
     * A callable that runs given task and returns given result
     */
    static final class RunnableAdapter<T> implements Callable<T> {
        final Runnable task;
        final T result;
        RunnableAdapter(Runnable task, T result) {
            this.task = task;
            this.result = result;
        }
        public T call() {
            task.run();
            return result;
        }
    }
可以明显看出来,这个方法采用了设计模式中的适配器模式,将一个Runnable类型对象适配成Callable类型。
因为Runnable接口没有返回值, 所以为了与Callable兼容, 我们额外传入了一个result参数, 使得返回的Callable对象的call方法直接执行Runnable的run方法, 然后返回传入的result参数。有的同学要说了, 你把result参数传进去, 又原封不动的返回出来, 有什么意义呀? 这样做确实没什么意义, result参数的存在只是为了将一个Runnable类型适配成Callable类型。
Unsafe
关于Java中的Unsafe,请看我的另外一篇文章:java Unsafe介绍
基本使用
import java.util.concurrent.Callable;
import java.util.concurrent.ExecutionException;
import java.util.concurrent.ExecutorService;
import java.util.concurrent.Executors;
import java.util.concurrent.FutureTask;

public class FutureTaskDemo {

	private static final ExecutorService executorService = Executors.newSingleThreadExecutor();

	public FutureTask<String> getFutureTask() throws ExecutionException, InterruptedException {
		return new FutureTask<String>(new Callable<String>() {
			@Override
			public String call() throws Exception {
				System.out.println("hello");
				return "ok";
			}
		});
	}

	public static void main(String[] args) throws ExecutionException, InterruptedException {
		FutureTaskDemo futureTaskDemo = new FutureTaskDemo();

		FutureTask<String> futureTask = futureTaskDemo.getFutureTask();
		executorService.execute(futureTask);

		Thread.sleep(100);
		if (futureTask.isDone()) {
			System.out.println(futureTask.get());
		}
		executorService.shutdown();
	}
}
源码解析
Java并发工具类的三板斧: 状态,队列,CAS。 以这三个方面为切入点来看源码,有助于我们快速的看清FutureTask的概貌:
FutureTask状态
在FutureTask的源代码中定义了如下的7种状态:
    /**
     * The run state of this task, initially NEW.  The run state
     * transitions to a terminal state only in methods set,
     * setException, and cancel.  During completion, state may take on
     * transient values of COMPLETING (while outcome is being set) or
     * INTERRUPTING (only while interrupting the runner to satisfy a
     * cancel(true)). Transitions from these intermediate to final
     * states use cheaper ordered/lazy writes because values are unique
     * and cannot be further modified.
     *
     * Possible state transitions:
     * NEW -> COMPLETING -> NORMAL
     * NEW -> COMPLETING -> EXCEPTIONAL
     * NEW -> CANCELLED
     * NEW -> INTERRUPTING -> INTERRUPTED
     */
    private volatile int state;
    private static final int NEW          = 0;
    private static final int COMPLETING   = 1;
    private static final int NORMAL       = 2;
    private static final int EXCEPTIONAL  = 3;
    private static final int CANCELLED    = 4;
    private static final int INTERRUPTING = 5;
    private static final int INTERRUPTED  = 6;
为确保不同线程对state修改的可见性,所以state是volatile类型。
state属性是贯穿整个FutureTask的最核心的属性,该属性的值代表了任务在运行过程中的状态,随着任务的执行,状态将不断地进行转变,从上面的定义中可以看出,总共有7种状态:包括了1个初始态,2个中间态和4个终止态。虽说状态有这么多,但是状态的转换路径却只有四种:
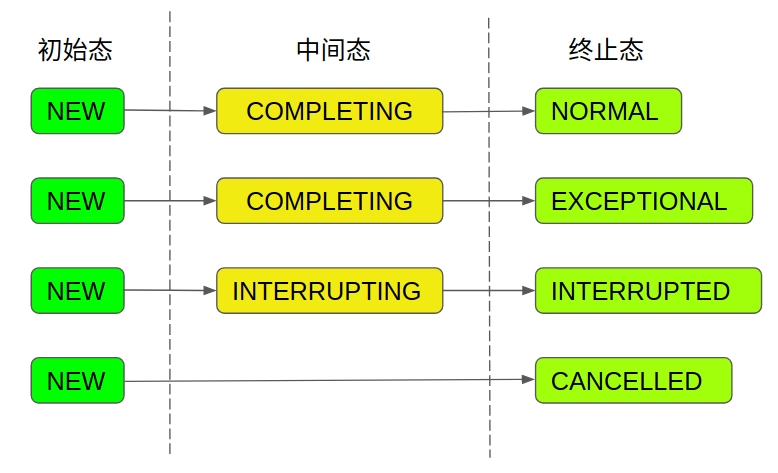
任务的初始状态都是
NEW, 这一点是构造函数保证的。任务的终止状态有4种:
NORMAL:任务正常执行完毕EXCEPTIONAL:任务执行过程中发生异常CANCELLED:任务被取消INTERRUPTED:任务被中断
任务的中间状态有2种:
COMPLETING正在设置任务结果INTERRUPTING正在中断运行任务的线程
值得一提的是,任务的中间状态是一个瞬态,它非常的短暂。而且任务的中间态并不代表任务正在执行,而是任务已经执行完了,正在设置最终的返回结果,所以可以这么说:
只要state不处于 NEW 状态,就说明任务已经执行完毕
注意,这里的执行完毕是指传入的Callable对象的call方法执行完毕,或者抛出了异常。所以这里的COMPLETING的名字显得有点迷惑性,它并不意味着任务正在执行中,而意味着call方法已经执行完毕,正在设置任务执行的结果。而将一个任务的状态设置成终止态只有三种方法:
- set
- setException
- cancel
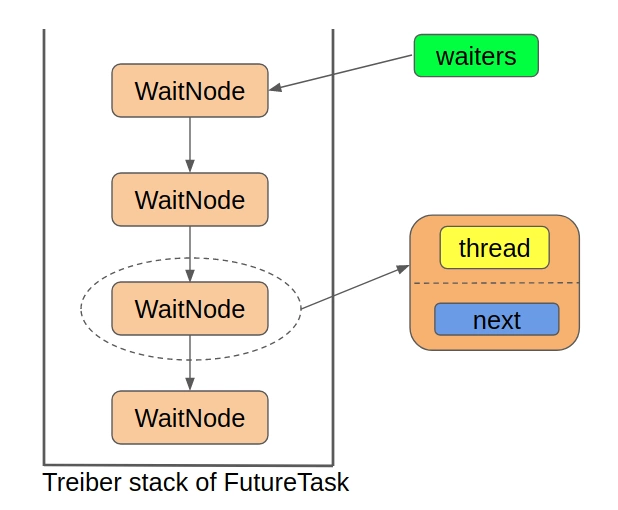
接着我们来看队列,在FutureTask中,队列的实现是一个单向链表,它表示所有等待任务执行完毕的线程的集合。我们知道,FutureTask实现了Future接口,可以获取“Task”的执行结果,那么如果获取结果时,任务还没有执行完毕怎么办呢?那么获取结果的线程就会在一个等待队列中挂起,直到任务执行完毕被唤醒。
在并发编程中使用队列通常是将当前线程包装成某种类型的数据结构扔到等待队列中,我们先来看看队列中的每一个节点是怎么个结构:
   /**
     * Simple linked list nodes to record waiting threads in a Treiber
     * stack.  See other classes such as Phaser and SynchronousQueue
     * for more detailed explanation.
     */
    static final class WaitNode {
        volatile Thread thread;
        volatile WaitNode next;
        WaitNode() { thread = Thread.currentThread(); }
    }
它只包含了一个记录线程的thread属性和指向下一个节点的next属性。FutureTask中的这个单向链表是当做栈来使用的,确切来说是当做Treiber栈来使用的,不了解Treiber栈是个啥的可以简单的把它当做是一个线程安全的栈, 它使用CAS来完成入栈出栈操作。
为啥要使用一个线程安全的栈呢,因为同一时刻可能有多个线程都在获取任务的执行结果,如果任务还在执行过程中,则这些线程就要被包装成WaitNode扔到Treiber栈的栈顶,即完成入栈操作,这样就有可能出现多个线程同时入栈的情况,因此需要使用CAS操作保证入栈的线程安全,对于出栈的情况也是同理。
由于FutureTask中的队列本质上是一个Treiber栈,那么使用这个队列就只需要一个指向栈顶节点的指针就行了,在FutureTask中,就是waiters属性:
/** Treiber stack of waiting threads */
private volatile WaitNode waiters;
事实上,它就是整个单向链表的头节点。综上,FutureTask中所使用的队列的结构如下:
CAS操作大多数是用来改变状态的,在FutureTask中也不例外。我们一般在静态代码块中初始化需要CAS操作的属性的偏移量:
 // Unsafe mechanics
    private static final sun.misc.Unsafe UNSAFE;
    private static final long stateOffset;
    private static final long runnerOffset;
    private static final long waitersOffset;
    static {
        try {
            UNSAFE = sun.misc.Unsafe.getUnsafe();
            Class<?> k = FutureTask.class;
            stateOffset = UNSAFE.objectFieldOffset
                (k.getDeclaredField("state"));
            runnerOffset = UNSAFE.objectFieldOffset
                (k.getDeclaredField("runner"));
            waitersOffset = UNSAFE.objectFieldOffset
                (k.getDeclaredField("waiters"));
        } catch (Exception e) {
            throw new Error(e);
        }
    }
从这个静态代码块中我们也可以看出,CAS操作主要针对3个属性,包括state、runner和waiters,说明这3个属性基本是会被多个线程同时访问的。
- state属性代表了任务的状态
- waiters属性代表了指向栈顶节点的指针,这两个我们上面已经分析过了。
- runner属性代表了执行FutureTask中的“Task”的线程。
为什么需要一个属性来记录执行任务的线程呢?这是为了中断或者取消任务做准备的,只有知道了执行任务的线程是谁,我们才能去中断它。
定义完属性的偏移量之后,接下来就是CAS操作本身了。在FutureTask,CAS操作最终调用的还是Unsafe类的compareAndSwapXXX方法。
FutureTask的核心属性
  private volatile int state;
    private static final int NEW          = 0;
    private static final int COMPLETING   = 1;
    private static final int NORMAL       = 2;
    private static final int EXCEPTIONAL  = 3;
    private static final int CANCELLED    = 4;
    private static final int INTERRUPTING = 5;
    private static final int INTERRUPTED  = 6;

    /** The underlying callable; nulled out after running */
    private Callable<V> callable;
    /** The result to return or exception to throw from get() */
    private Object outcome; // non-volatile, protected by state reads/writes
    /** The thread running the callable; CASed during run() */
    private volatile Thread runner;
    /** Treiber stack of waiting threads */
    private volatile WaitNode waiters;
可以看出,FutureTask的核心属性只有5个:
- state 属性代表了任务的状态
- callable 属性代表了要执行的任务本身,即FutureTask中的“Task”部分。这里之所以用
Callable而不用Runnable是因为FutureTask实现了Future接口,需要获取任务的执行结果。 - outcome 属性代表了任务的执行结果或者抛出的异常,为
Object类型,也就是说outcome可以是任意类型的对象,所以当我们将正常的执行结果返回给调用者时,需要进行强制类型转换, 返回由Callable定义的V类型 - runner 属性代表了执行FutureTask中的“Task”的线程,这是为了中断或者取消任务做准备。
- waiters 属性代表了指向栈顶节点的指针
构造函数
    /**
     * Creates a {@code FutureTask} that will, upon running, execute the
     * given {@code Callable}.
     *
     * @param  callable the callable task
     * @throws NullPointerException if the callable is null
     */
    public FutureTask(Callable<V> callable) {
        if (callable == null)
            throw new NullPointerException();
        this.callable = callable;
        this.state = NEW;       // ensure visibility of callable
    }

    /**
     * Creates a {@code FutureTask} that will, upon running, execute the
     * given {@code Runnable}, and arrange that {@code get} will return the
     * given result on successful completion.
     *
     * @param runnable the runnable task
     * @param result the result to return on successful completion. If
     * you don't need a particular result, consider using
     * constructions of the form:
     * {@code Future<?> f = new FutureTask<Void>(runnable, null)}
     * @throws NullPointerException if the runnable is null
     */
    public FutureTask(Runnable runnable, V result) {
        this.callable = Executors.callable(runnable, result);
        this.state = NEW;       // ensure visibility of callable
    }
FutureTask共有2个构造函数,这2个构造函数一个是直接传入Callable对象, 一个是传入一个Runnable对象和一个指定的result, 然后通过Executors工具类将它适配成callable对象, 所以这两个构造函数的本质是一样的:
- 用传入的参数初始化callable成员变量
- 将FutureTask的状态设为NEW
FutureTask接口实现
FutureTask实现了RunnableFuture接口, 因此,它必须实现Runnable和Future接口的所有方法。
Runnable接口实现
要实现Runnable接口, 就得覆写run方法, 我们看看FutureTask的run方法干了点啥:
public void run() {
        if (state != NEW ||
            !UNSAFE.compareAndSwapObject(this, runnerOffset,
                                         null, Thread.currentThread()))
            return;
        try {
            Callable<V> c = callable;
            if (c != null && state == NEW) {
                V result;
                boolean ran;
                try {
                    result = c.call();
                    ran = true;
                } catch (Throwable ex) {
                    result = null;
                    ran = false;
                    setException(ex);
                }
                if (ran)
                    set(result);
            }
        } finally {
            // runner must be non-null until state is settled to
            // prevent concurrent calls to run()
            runner = null;
            // state must be re-read after nulling runner to prevent
            // leaked interrupts
            int s = state;
            if (s >= INTERRUPTING)
                handlePossibleCancellationInterrupt(s);
        }
    }
- 首先检查当前状态是不是
New, 并且使用CAS操作将runner属性设置位当前线程,即记录执行任务的线程。可见runner属性是在运行时被初始化的。如果不满足这个条件,则直return。 - 然后调用
Callable对象的call方法来执行任务,如果任务执行成功,就使用set(result)设置结果,否则,用setException(ex)设置抛出的异常。 - 最后在
finally块中,我们将runner属性置为null,并且检查有没有遗漏的中断,如果发现s >= INTERRUPTING, 说明执行任务的线程有可能被中断了,因为s >= INTERRUPTING只有两种可能,state状态为INTERRUPTING和INTERRUPTED。
然后详细说一下其中的set(result)方法:
    /**
     * Sets the result of this future to the given value unless
     * this future has already been set or has been cancelled.
     *
     * <p>This method is invoked internally by the {@link #run} method
     * upon successful completion of the computation.
     *
     * @param v the value
     */
    protected void set(V v) {
        if (UNSAFE.compareAndSwapInt(this, stateOffset, NEW, COMPLETING)) {
            outcome = v;
            UNSAFE.putOrderedInt(this, stateOffset, NORMAL); // final state
            finishCompletion();
        }
    }
这个方法一开始通过CAS操作将state属性由原来的NEW状态修改为COMPLETING状态,我们在一开始介绍state状态的时候说过,COMPLETING是一个非常短暂的中间态,表示正在设置执行的结果。
状态设置成功后,我们就把任务执行结果赋值给outcome, 然后直接把state状态设置成NORMAL,注意,这里是直接设置,没有先比较再设置的操作,由于state属性被设置成volatile,这里putOrderedInt和putIntVolatile是等价的,保证了state状态对其他线程的可见性。
在这之后,我们调用了 finishCompletion()来完成执行结果的设置。
接下来我们再来看看发生了异常的版本setException(ex)。
   /**
     * Causes this future to report an {@link ExecutionException}
     * with the given throwable as its cause, unless this future has
     * already been set or has been cancelled.
     *
     * <p>This method is invoked internally by the {@link #run} method
     * upon failure of the computation.
     *
     * @param t the cause of failure
     */
    protected void setException(Throwable t) {
        if (UNSAFE.compareAndSwapInt(this, stateOffset, NEW, COMPLETING)) {
            outcome = t;
            UNSAFE.putOrderedInt(this, stateOffset, EXCEPTIONAL); // final state
            finishCompletion();
        }
    }
可见,除了将outcome属性赋值为异常对象,以及将state的终止状态修改为EXCEPTIONAL,其余都和set方法类似。在方法的最后,都调用了 finishCompletion()来完成执行结果的设置。那么我们就来看看 finishCompletion()干了点啥:
  /**
     * Removes and signals all waiting threads, invokes done(), and
     * nulls out callable.
     */
    private void finishCompletion() {
        // assert state > COMPLETING;
        for (WaitNode q; (q = waiters) != null;) {
            if (UNSAFE.compareAndSwapObject(this, waitersOffset, q, null)) {
                for (;;) {
                    Thread t = q.thread;
                    if (t != null) {
                        q.thread = null;
                        LockSupport.unpark(t);
                    }
                    WaitNode next = q.next;
                    if (next == null)
                        break;
                    q.next = null; // unlink to help gc
                    q = next;
                }
                break;
            }
        }

        done();

        callable = null;        // to reduce footprint
    }
这个方法事实上完成了一个“善后”工作。我们先来看看if条件语句中的CAS操作:
UNSAFE.compareAndSwapObject(this, waitersOffset, q, null)
该方法是将waiters属性的值由原值设置为null, 我们知道,waiters属性指向了Treiber栈的栈顶节点,可以说是代表了整个Treiber栈,将该值设为null的目的就是清空整个栈。
然后又进行下一轮for循环,而下一轮for循环的判断条件又是waiters!=null ,由此我们知道,虽然最外层的for循环乍一看好像是什么遍历节点的操作,其实只是为了确保waiters属性被成功设置成null,本质上相当于一个自旋操作。
将waiters属性设置成null以后,接下了 for (;;)死循环才是真正的遍历节点,可以看出,循环内部就是一个普通的遍历链表的操作,我们前面讲属性的时候说过,Treiber栈里面存放的WaitNode代表了当前等待任务执行结束的线程,这个循环的作用也正是遍历链表中所有等待的线程,并唤醒他们。
将Treiber栈中所有挂起的线程都唤醒后,下面就是执行done方法:
   /**
     * Protected method invoked when this task transitions to state
     * {@code isDone} (whether normally or via cancellation). The
     * default implementation does nothing.  Subclasses may override
     * this method to invoke completion callbacks or perform
     * bookkeeping. Note that you can query status inside the
     * implementation of this method to determine whether this task
     * has been cancelled.
     */
    protected void done() { }
这个方法是一个空方法,从注释上看,它是提供给子类覆写的,以实现一些任务执行结束前的额外操作。 done方法之后就是callable属性的清理了(callable = null)。
然后我们在详细说说finally代码块中的方法。
在finally块中,我们将runner属性置为null,并且检查有没有遗漏的中断,如果发现s >= INTERRUPTING, 说明执行任务的线程有可能被中断了,因为s >= INTERRUPTING 只有两种可能,state状态为INTERRUPTING和INTERRUPTED。
有的同学可能就要问了,咱前面已经执行过的set方法或者setException方法不是已经将state状态设置成NORMAL或者EXCEPTIONAL了吗?怎么会出现INTERRUPTING或者INTERRUPTED状态呢?别忘了,咱们在多线程的环境中,在当前线程执行run方法的同时,有可能其他线程取消了任务的执行,此时其他线程就可能对state状态进行改写,这也就是我们在设置终止状态的时候用putOrderedInt方法,而没有用CAS操作的原因——我们无法确信在设置state前是处于COMPLETING中间态还是INTERRUPTING中间态。
接下来我们来看看handlePossibleCancellationInterrupt方法干了点啥:
  /**
     * Ensures that any interrupt from a possible cancel(true) is only
     * delivered to a task while in run or runAndReset.
     */
    private void handlePossibleCancellationInterrupt(int s) {
        // It is possible for our interrupter to stall before getting a
        // chance to interrupt us.  Let's spin-wait patiently.
        if (s == INTERRUPTING)
            while (state == INTERRUPTING)
                Thread.yield(); // wait out pending interrupt

        // assert state == INTERRUPTED;

        // We want to clear any interrupt we may have received from
        // cancel(true).  However, it is permissible to use interrupts
        // as an independent mechanism for a task to communicate with
        // its caller, and there is no way to clear only the
        // cancellation interrupt.
        //
        // Thread.interrupted();
    }
可见该方法是一个自旋操作,如果当前的state状态是INTERRUPTING,我们在原地自旋,直到state状态转换成终止态。
至此,run方法的分析就真的结束了。我们来总结一下:
run方法重点做了以下几件事:
- 将
runner属性设置成当前正在执行run方法的线程 - 调用
callable成员变量的call方法来执行任务 - 设置执行结果
outcome, 如果执行成功, 则outcome保存的就是执行结果;如果执行过程中发生了异常, 则outcome中保存的就是异常,设置结果之前,先将state状态设为中间态COMPLETING - 对
outcome的赋值完成后,设置state状态为终止态(NORMAL或者EXCEPTIONAL) - 唤醒
Treiber栈中所有等待的线程 - 善后清理(waiters, callable,runner设为null)
- 检查是否有遗漏的中断,如果有,等待中断状态完成。
这里再插一句,我们前面说“state只要不是NEW状态,就说明任务已经执行完成了”就体现在这里,因为run方法中,我们是在c.call()执行完毕或者抛出了异常之后才开始设置中间态和终止态的。
Future接口实现
Future接口一共定义了5个方法,我们一个个来看:
cancel(boolean mayInterruptIfRunning)
既然上面在分析run方法的最后,我们提到了任务可能被别的线程取消,那我们看看怎么取消一个任务的执行:
public boolean cancel(boolean mayInterruptIfRunning) {
        if (!(state == NEW &&
              UNSAFE.compareAndSwapInt(this, stateOffset, NEW,
                  mayInterruptIfRunning ? INTERRUPTING : CANCELLED)))
            return false;
        try {    // in case call to interrupt throws exception
            if (mayInterruptIfRunning) {
                try {
                    Thread t = runner;
                    if (t != null)
                        t.interrupt();
                } finally { // final state
                    UNSAFE.putOrderedInt(this, stateOffset, INTERRUPTED);
                }
            }
        } finally {
            finishCompletion();
        }
        return true;
    }
在前面我们已经介绍过Future#cancel方法了:
- cancel(boolean mayInterruptIfRunning)
- 该方法用来尝试取消一个任务的执行, 它的返回值是boolean类型, 表示取消操作是否成功。以下三种情况之一的,cancel操作一定是失败的,返回false:
- 任务已经执行完成了
- 任务已经被取消过了
- 任务因为某种原因不能被取消
- 值得注意的是,
cancel操作返回true并不代表任务真的就是被取消了,这取决于发动cancel状态时任务所处的状态:- 如果发起cancel时任务还没有开始运行,则随后任务就不会被执行;
- 如果发起cancel时任务已经在运行了,则这时就需要看
mayInterruptIfRunning参数了:- 如果
mayInterruptIfRunning为true, 则当前在执行的任务会被中断 - 如果
mayInterruptIfRunning为false, 则可以允许正在执行的任务继续运行,直到它执行完
- 如果
- 该方法用来尝试取消一个任务的执行, 它的返回值是boolean类型, 表示取消操作是否成功。以下三种情况之一的,cancel操作一定是失败的,返回false:
我们来看看FutureTask是怎么实现cancel方法的这几个规范的:
首先,对于「任务已经执行完成了或者任务已经被取消过了,则cancel操作一定是失败的(返回false)」这两条,是通过简单的判断state值是否为NEW实现的,因为我们前面说过了,只要state不为NEW,说明任务已经执行完毕了。从代码中可以看出,只要state不为NEW,则直接返回false。
如果state还是NEW状态,我们再往下看:
UNSAFE.compareAndSwapInt(this, stateOffset, NEW, mayInterruptIfRunning ? INTERRUPTING : CANCELLED)
这一段是根据mayInterruptIfRunning的值将state的状态由NEW设置成INTERRUPTING或者CANCELLED,当这一操作也成功之后,就可以执行后面的try语句了,但无论怎么,该方法最后都返回了true。
我们再接着看try块干了点啥:
try {    // in case call to interrupt throws exception
    if (mayInterruptIfRunning) {
        try {
            Thread t = runner;
            if (t != null)
                t.interrupt();
        } finally { // final state
            UNSAFE.putOrderedInt(this, stateOffset, INTERRUPTED);
        }
    }
} finally {
    finishCompletion();
}
我们知道,runner属性中存放的是当前正在执行任务的线程,因此,这个try块的目的就是中断当前正在执行任务的线程,最后将state的状态设为INTERRUPTED,当然,中断操作完成后,还需要通过finishCompletion()来唤醒所有在Treiber栈中等待的线程。我们现在总结一下,cancel方法实际上完成以下两种状态转换之一:
NEW -> CANCELLED(对应于mayInterruptIfRunning=false)NEW -> INTERRUPTING -> INTERRUPTED(对应于mayInterruptIfRunning=true)
对于第一条路径,虽说cancel方法最终返回了true,但它只是简单的把state状态设为CANCELLED,并不会中断线程的执行。但是这样带来的后果是,任务即使执行完毕了,也无法设置任务的执行结果,因为前面分析run方法的时候我们知道,设置任务结果有一个中间态,而这个中间态的设置,是以当前state状态为NEW为前提的。
对于第二条路径,则会中断执行任务的线程,我们在倒回上面的run方法看看:
public void run() {
    if (state != NEW || !UNSAFE.compareAndSwapObject(this, runnerOffset, null, Thread.currentThread()))
        return;
    try {
        Callable<V> c = callable;
        if (c != null && state == NEW) {
            V result;
            boolean ran;
            try {
                result = c.call();
                ran = true;
            } catch (Throwable ex) {
                result = null;
                ran = false;
                setException(ex);
            }
            if (ran)
                set(result);
        }
    } finally {
        // runner must be non-null until state is settled to
        // prevent concurrent calls to run()
        runner = null;
        // state must be re-read after nulling runner to prevent
        // leaked interrupts
        int s = state;
        if (s >= INTERRUPTING)
            handlePossibleCancellationInterrupt(s);
    }
}
虽然第二条路径中断了当前正在执行的线程,但是,响不响应这个中断是由执行任务的线程自己决定的,更具体的说,这取决于c.call()方法内部是否对中断进行了响应,是否将中断异常抛出。那call方法中是怎么处理中断的呢?从上面的代码中可以看出,catch语句处理了所有的Throwable的异常,这自然也包括了中断异常。
然而,值得一提的是,即使这里进入了catch (Throwable ex){}代码块,setException(ex)的操作一定是失败的,因为在我们取消任务执行的线程中,我们已经先把state状态设为INTERRUPTING了,而setException(ex)的操作要求设置前线程的状态为NEW。所以这里响应cancel方法所造成的中断最大的意义不是为了对中断进行处理,而是简单的停止任务线程的执行,节省CPU资源。
那读者可能会问了,既然这个setException(ex)的操作一定是失败的,那放在这里有什么用呢?事实上,这个setException(ex)是用来处理任务自己在正常执行过程中产生的异常的,在我们没有主动去cancel任务时,任务的state状态在执行过程中就会始终是NEW,如果任务此时自己发生了异常,则这个异常就会被setException(ex)方法成功的记录到outcome中。
反正无论如何,run方法最终都会进入finally块,而这时候它会发现s >= INTERRUPTING,如果检测发现s = INTERRUPTING,说明cancel方法还没有执行到中断当前线程的地方,那就等待它将state状态设置成INTERRUPTED。到这里,对cancel方法的分析就和上面对run方法的分析对接上了。
cancel方法到这里就分析完了,如果你一条条的去对照Future接口对于cancel方法的规范,它每一条都是实现了的,而它实现的核心机理,就是对state的当前状态的判断和设置。由此可见,state属性是贯穿整个FutureTask的最核心的属性。
isCancelled()
说完了cancel,我们再来看看 isCancelled()方法,相较而言,它就简单多了:
public boolean isCancelled() {
    return state >= CANCELLED;
}
那么state >= CANCELLED 包含了那些状态呢,它包括了: CANCELLED INTERRUPTING INTERRUPTED
Future接口对于isCancelled()方法的规范:
该方法用于判断任务是否被取消了。如果一个任务在正常执行完成之前被Cancel掉了, 则返回true
再对比state的状态图:
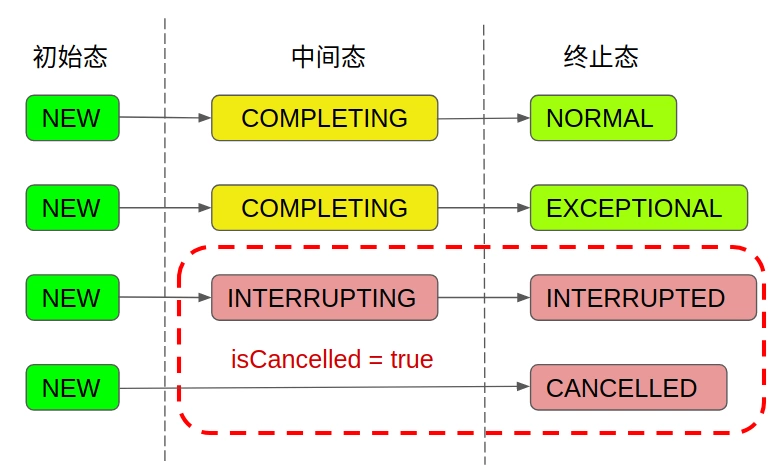
可见选取这三个状态作为判断依据是很合理的, 因为只有调用了cancel方法,才会使state状态进入这三种状态。
isDone()
与 isCancelled方法类似,isDone方法也是简单地通过state状态来判断。
public boolean isDone() {
    return state != NEW;
}
关于这一点,其实我们之前已经说过了,只要state状态不是NEW,则任务已经执行完毕了,因为state状态不存在类似“任务正在执行中”这种状态,即使是短暂的中间态,也是发生在任务已经执行完毕,正在设置任务结果的时候。
get()
最后我们来看看获取执行结果的get方法,先来看看无参的版本:
  /**
     * @throws CancellationException {@inheritDoc}
     */
    public V get() throws InterruptedException, ExecutionException {
        int s = state;
        if (s <= COMPLETING)
            s = awaitDone(false, 0L);
        return report(s);
    }
该方法其实很简单,当任务还没有执行完毕或者正在设置执行结果时,我们就使用awaitDone方法等待任务进入终止态,注意,awaitDone的返回值是任务的状态,而不是任务的结果。任务进入终止态之后,我们就根据任务的执行结果来返回计算结果或者抛出异常。
我们先来看看等待任务完成的awaitDone方法,该方法是获取任务结果最核心的方法,它完成了获取结果,挂起线程,响应中断等诸多操作:
  /**
     * Awaits completion or aborts on interrupt or timeout.
     *
     * @param timed true if use timed waits
     * @param nanos time to wait, if timed
     * @return state upon completion
     */
    private int awaitDone(boolean timed, long nanos)
        throws InterruptedException {
        final long deadline = timed ? System.nanoTime() + nanos : 0L;
        WaitNode q = null;
        boolean queued = false;
        for (;;) {
            if (Thread.interrupted()) {
                removeWaiter(q);
                throw new InterruptedException();
            }

            int s = state;
            if (s > COMPLETING) {
                if (q != null)
                    q.thread = null;
                return s;
            }
            else if (s == COMPLETING) // cannot time out yet
                Thread.yield();
            else if (q == null)
                q = new WaitNode();
            else if (!queued)
                queued = UNSAFE.compareAndSwapObject(this, waitersOffset,
                                                     q.next = waiters, q);
            else if (timed) {
                nanos = deadline - System.nanoTime();
                if (nanos <= 0L) {
                    removeWaiter(q);
                    return state;
                }
                LockSupport.parkNanos(this, nanos);
            }
            else
                LockSupport.park(this);
        }
    }
在具体分析它的源码之前,有一点我们先特别说明一下,FutureTask中会涉及到两类线程,一类是执行任务的线程,它只有一个,FutureTask的run方法就由该线程来执行;一类是获取任务执行结果的线程,它可以有多个,这些线程可以并发执行,每一个线程都是独立的,都可以调用get方法来获取任务的执行结果。如果任务还没有执行完,则这些线程就需要进入Treiber栈中挂起,直到任务执行结束,或者等待的线程自身被中断。
理清了这一点后,我们再来详细看看awaitDone方法。可以看出,该方法的大框架是一个自旋操作,我们一段一段来看:
for (;;) {
    if (Thread.interrupted()) {
        removeWaiter(q);
        throw new InterruptedException();
    }
    // ...
}
首先一开始,我们先检测当前线程是否被中断了,这是因为get方法是阻塞式的,如果等待的任务还没有执行完,则调用get方法的线程会被扔到Treiber栈中挂起等待,直到任务执行完毕。但是,如果任务迟迟没有执行完毕,则我们也有可能直接中断在Treiber栈中的线程,以停止等待。
当检测到线程被中断后,我们调用了removeWaiter:
   /**
     * Tries to unlink a timed-out or interrupted wait node to avoid
     * accumulating garbage.  Internal nodes are simply unspliced
     * without CAS since it is harmless if they are traversed anyway
     * by releasers.  To avoid effects of unsplicing from already
     * removed nodes, the list is retraversed in case of an apparent
     * race.  This is slow when there are a lot of nodes, but we don't
     * expect lists to be long enough to outweigh higher-overhead
     * schemes.
     */
    private void removeWaiter(WaitNode node) {
        if (node != null) {
            node.thread = null;
            retry:
            for (;;) {          // restart on removeWaiter race
                for (WaitNode pred = null, q = waiters, s; q != null; q = s) {
                    s = q.next;
                    if (q.thread != null)
                        pred = q;
                    else if (pred != null) {
                        pred.next = s;
                        if (pred.thread == null) // check for race
                            continue retry;
                    }
                    else if (!UNSAFE.compareAndSwapObject(this, waitersOffset,
                                                          q, s))
                        continue retry;
                }
                break;
            }
        }
    }
removeWaiter的作用是将参数中的node从等待队列(即Treiber栈)中移除。如果此时线程还没有进入Treiber栈,则 q=null,那么removeWaiter(q)啥也不干。在这之后,我们就直接抛出了InterruptedException异常。
接着看awaitDone中的for(;;):
for (;;) {
    /*if (Thread.interrupted()) {
        removeWaiter(q);
        throw new InterruptedException();
    }*/
    int s = state;
    if (s > COMPLETING) {
        if (q != null)
            q.thread = null;
        return s;
    }
    else if (s == COMPLETING) // cannot time out yet
        Thread.yield();
    else if (q == null)
        q = new WaitNode();
    else if (!queued)
        queued = UNSAFE.compareAndSwapObject(this, waitersOffset,
                                             q.next = waiters, q);
    else if (timed) {
        nanos = deadline - System.nanoTime();
        if (nanos <= 0L) {
            removeWaiter(q);
            return state;
        }
        LockSupport.parkNanos(this, nanos);
    }
    else
        LockSupport.park(this);
}
- 如果任务已经进入终止态(
s > COMPLETING),我们就直接返回任务的状态; - 如果任务正在设置执行结果(
s == COMPLETING),我们就让出当前线程的CPU资源继续等待 - 否则,就说明任务还没有执行,或者任务正在执行过程中,那么这时,如果q现在还为null, 说明当前线程还没有进入等待队列,于是我们新建了一个
WaitNode, WaitNode的构造函数我们之前已经看过了,就是生成了一个记录了当前线程的节点; - 如果q不为null,说明代表当前线程的
WaitNode已经被创建出来了,则接下来如果queued=false,表示当前线程还没有入队,所以我们执行了:
queued = UNSAFE.compareAndSwapObject(this, waitersOffset, q.next = waiters, q);
这行代码的作用是通过CAS操作将新建的q节点添加到waiters链表的头节点之前,其实就是Treiber栈的入栈操作,写的还是很简洁的,一行代码就搞定了,如果大家还是觉得晕乎,下面是它等价的伪代码:
q.next = waiters; //当前节点的next指向目前的栈顶元素
//如果栈顶节点在这个过程中没有变,即没有发生并发入栈的情况
if(waiters的值还是上面q.next所使用的waiters值){
    waiters = q; //修改栈顶的指针,指向刚刚入栈的节点
}
这个CAS操作就是为了保证同一时刻如果有多个线程在同时入栈,则只有一个能够操作成功,也即Treiber栈的规范。
如果以上的条件都不满足,则再接下来因为现在是不带超时机制的get,timed为false,则else if代码块跳过,然后来到最后一个else, 把当前线程挂起,此时线程就处于阻塞等待的状态。
至此,在任务没有执行完毕的情况下,获取任务执行结果的线程就会在Treiber栈中被LockSupport.park(this)挂起了。
那么这个挂起的线程什么时候会被唤醒呢?有两种情况:
- 任务执行完毕了,在
finishCompletion方法中会唤醒所有在Treiber栈中等待的线程 - 等待的线程自身因为被中断等原因而被唤醒。
我们接下来就继续看看线程被唤醒后的情况,此时,线程将回到for(;;)循环的开头,继续下一轮循环,在复制一下上面的代码:
for (;;) {
    if (Thread.interrupted()) {
        removeWaiter(q);
        throw new InterruptedException();
    }

    int s = state;
    if (s > COMPLETING) {
        if (q != null)
            q.thread = null;
        return s;
    }
    else if (s == COMPLETING) // cannot time out yet
        Thread.yield();
    else if (q == null)
        q = new WaitNode();
    else if (!queued)
        queued = UNSAFE.compareAndSwapObject(this, waitersOffset,
                                             q.next = waiters, q);
    else if (timed) {
        nanos = deadline - System.nanoTime();
        if (nanos <= 0L) {
            removeWaiter(q);
            return state;
        }
        LockSupport.parkNanos(this, nanos);
    }
    else
        LockSupport.park(this); // 挂起的线程从这里被唤醒
}
首先自然还是检测中断,所不同的是,此时q已经不为null了,因此在有中断发生的情况下,在抛出中断之前,多了一步removeWaiter(q)操作,该操作是将当前线程从等待的Treiber栈中移除,相比入栈操作,这个出栈操作要复杂一点,这取决于节点是否位于栈顶。下面我们来仔细分析这个出栈操作:
 /**
     * Tries to unlink a timed-out or interrupted wait node to avoid
     * accumulating garbage.  Internal nodes are simply unspliced
     * without CAS since it is harmless if they are traversed anyway
     * by releasers.  To avoid effects of unsplicing from already
     * removed nodes, the list is retraversed in case of an apparent
     * race.  This is slow when there are a lot of nodes, but we don't
     * expect lists to be long enough to outweigh higher-overhead
     * schemes.
     */
    private void removeWaiter(WaitNode node) {
        if (node != null) {
            node.thread = null;
            retry:
            for (;;) {          // restart on removeWaiter race
                for (WaitNode pred = null, q = waiters, s; q != null; q = s) {
                    s = q.next;
                    if (q.thread != null)
                        pred = q;
                    else if (pred != null) {
                        pred.next = s;
                        if (pred.thread == null) // check for race
                            continue retry;
                    }
                    else if (!UNSAFE.compareAndSwapObject(this, waitersOffset,
                                                          q, s))
                        continue retry;
                }
                break;
            }
        }
    }
首先,我们把要出栈的WaitNode的thread属性设置为null, 这相当于一个标记,是我们后面在waiters链表中定位该节点的依据。
- 要移除的节点就在栈顶
- 我们先来看看该节点就位于栈顶的情况,这说明在该节点入栈后,并没有别的线程再入栈了。由于一开始我们就将该节点的thread属性设为了null,因此,前面的
q.thread != null和pred != null都不满足,我们直接进入到最后一个else if分支:
- 我们先来看看该节点就位于栈顶的情况,这说明在该节点入栈后,并没有别的线程再入栈了。由于一开始我们就将该节点的thread属性设为了null,因此,前面的
else if (!UNSAFE.compareAndSwapObject(this, waitersOffset, q, s))
    continue retry;
这一段是栈顶节点出栈的操作,和入栈类似,采用了CAS比较,将栈顶元素设置成原栈顶节点的下一个节点。
值得注意的是,当CAS操作不成功时,程序会回到retry处重来,但即使CAS操作成功了,程序依旧会遍历完整个链表,找寻node.thread == null 的节点,并将它们一并从链表中剔除。
- 要移除的节点不在栈顶
- 当要移除的节点不在栈顶时,我们会一直遍历整个链表,直到找到
q.thread == null的节点,找到之后,我们将进入
- 当要移除的节点不在栈顶时,我们会一直遍历整个链表,直到找到
else if (pred != null) {
    pred.next = s;
    if (pred.thread == null) // check for race
        continue retry;
}
这是因为节点不在栈顶,则其必然是有前驱节点pred的,这时,我们只是简单的让前驱节点指向当前节点的下一个节点,从而将目标节点从链表中剔除。
注意,后面多加的那个if判断是很有必要的,因为removeWaiter方法并没有加锁,所以可能有多个线程在同时执行,WaitNode的两个成员变量thread和next都被设置成volatile,这保证了它们的可见性,如果我们在这时发现了pred.thread == null,那就意味着它已经被另一个线程标记了,将在另一个线程中被拿出waiters链表,而我们当前目标节点的原后继节点现在是接在这个pred节点上的,因此,如果pred已经被其他线程标记为要拿出去的节点,我们现在这个线程再继续往后遍历就没有什么意义了,所以这时就调到retry处,从头再遍历。
如果pred节点没有被其他线程标记,那我们就接着往下遍历,直到整个链表遍历完。
至此,将节点从waiters链表中移除的removeWaiter操作我们就分析完了,我们总结一下该方法:
在该方法中,会传入一个需要移除的节点,我们会将这个节点的thread属性设置成null,以标记该节点。然后无论如何,我们会遍历整个链表,清除那些被标记的节点(只是简单的将节点从链表中剔除)。如果要清除的节点就位于栈顶,则还需要注意重新设置waiters的值,指向新的栈顶节点。所以可以看出,虽说removeWaiter方法传入了需要剔除的节点,但是 事实上它可能剔除的不止是传入的节点,而是所有已经被标记了的节点,这样不仅清除操作容易了些(不需要专门去定位传入的node在哪里),而且提升了效率(可以同时清除所有已经被标记的节点)。
我们再回到awaitDone方法里:
private int awaitDone(boolean timed, long nanos) throws InterruptedException {
    final long deadline = timed ? System.nanoTime() + nanos : 0L;
    WaitNode q = null;
    boolean queued = false;
    for (;;) {
        if (Thread.interrupted()) {
            removeWaiter(q); // 刚刚分析到这里了,我们接着往下看
            throw new InterruptedException();
        }

        int s = state;
        if (s > COMPLETING) {
            if (q != null)
                q.thread = null;
            return s;
        }
        else if (s == COMPLETING) // cannot time out yet
            Thread.yield();
        else if (q == null)
            q = new WaitNode();
        else if (!queued)
            queued = UNSAFE.compareAndSwapObject(this, waitersOffset,
                                                 q.next = waiters, q);
        else if (timed) {
            nanos = deadline - System.nanoTime();
            if (nanos <= 0L) {
                removeWaiter(q);
                return state;
            }
            LockSupport.parkNanos(this, nanos);
        }
        else
            LockSupport.park(this);
    }
}
如果线程不是因为中断被唤醒,则会继续往下执行,此时会再次获取当前的state状态。所不同的是,此时q已经不为null, queued已经为true了,所以已经不需要将当前节点再入waiters栈了。
至此我们知道,除非被中断,否则get方法会在原地自旋等待(用的是Thread.yield,对应于s == COMPLETING)或者直接挂起(对应任务还没有执行完的情况),直到任务执行完成。而我们前面分析run方法和cancel方法的时候知道,在run方法结束后,或者cancel方法取消完成后,都会调用finishCompletion()来唤醒挂起的线程,使它们得以进入下一轮循环,获取任务执行结果。
最后,等awaitDone函数返回后,get方法返回了report(s),以根据任务的状态,汇报执行结果:
@SuppressWarnings("unchecked")
private V report(int s) throws ExecutionException {
    Object x = outcome;
    if (s == NORMAL)
        return (V)x;
    if (s >= CANCELLED)
        throw new CancellationException();
    throw new ExecutionException((Throwable)x);
}
可见,report方法非常简单,它根据当前state状态,返回正常执行的结果,或者抛出指定的异常。
至此,get方法就分析结束了。
值得注意的是,awaitDone方法和get方法都没有加锁,这在多个线程同时执行get方法的时候会不会产生线程安全问题呢?通过查看方法内部的参数我们知道,整个方法内部用的大多数是局部变量,因此不会产生线程安全问题,对于全局的共享变量waiters的修改时,也使用了CAS操作,保证了线程安全,而state变量本身是volatile的,保证了读取时的可见性,因此整个方法调用虽然没有加锁,它仍然是线程安全的。
get(long timeout, TimeUnit unit)
最后我们来看看带超时版本的get方法:
public V get(long timeout, TimeUnit unit) throws InterruptedException, ExecutionException, TimeoutException {
    if (unit == null)
        throw new NullPointerException();
    int s = state;
    if (s <= COMPLETING && (s = awaitDone(true, unit.toNanos(timeout))) <= COMPLETING)
        throw new TimeoutException();
    return report(s);
}
它和上面不带超时时间的get方法很类似,只是在awaitDone方法中多了超时检测:
else if (timed) {
    nanos = deadline - System.nanoTime();
    if (nanos <= 0L) {
        removeWaiter(q);
        return state;
    }
    LockSupport.parkNanos(this, nanos);
}
即,如果指定的超时时间到了,则直接返回,如果返回时,任务还没有进入终止状态,则直接抛出TimeoutException异常,否则就像get()方法一样,正常的返回执行结果。
总结
FutureTask实现了Runnable和Future接口,它表示了一个带有任务状态和任务结果的任务,它的各种操作都是围绕着任务的状态展开的。
值得注意的是,在所有的7个任务状态中,只要不是NEW状态,就表示任务已经执行完毕或者不再执行了,并没有表示“任务正在执行中”的状态。
除了代表了任务的Callable对象、代表任务执行结果的outcome属性,FutureTask还包含了一个代表所有等待任务结束的线程的Treiber栈,这一点其实和各种锁的等待队列特别像,即如果拿不到锁,则当前线程就会被扔进等待队列中;这里则是如果任务还没有执行结束,则所有等待任务执行完毕的线程就会被扔进Treiber栈中,直到任务执行完毕了,才会被唤醒。
FutureTask虽然为我们提供了获取任务执行结果的途径,遗憾的是,在获取任务结果时,如果任务还没有执行完成,则当前线程会自旋或者挂起等待,这和我们实现异步的初衷是相违背的,我们后面将继续介绍另一个同步工具类CompletableFuture, 它解决了这个问题。
参考资料
版权申明
本站点所有内容,版权均归https://wenchao.ren所有,除非明确授权,否则禁止一切形式的转载协议
打赏